/
Create a welcome page
Create a welcome page
- Mattias Löfstrand
Owned by Mattias Löfstrand
This guide shows how to create a custom welcome page that also may contain a legal notice.
Step-by-step guide
Creating a welcome page will require an html document to be added in Manager, and some configuration in Web Viewer.
- Create an html document for the language of choice. If several languages are used, create several html documents.
- When referring to images or css files in the html document, ensure to refer to these documents using this syntax:
<link rel='stylesheet' type='text/css' href='Content?fileName=support.css' media='screen'>
<img class="imgsize50" style="vertical-align:midlle" width="400px" src="Content?fileName='support.jpg'"> - Start Manager and open the document repository.
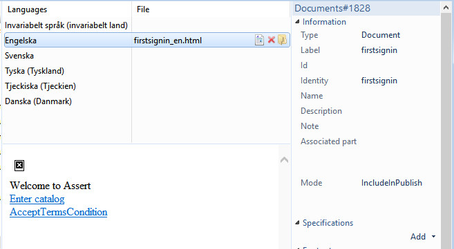
- Create a new document and add the html file to the document.
- Ensure to give the document the following properties
- Avoid giving the welcome page a name unless you want the end user to be able to search for it.
- An Identity that can be referred to in the Web Viewers profile.config. E.g. use "firstsignin".
- Ensure to set the mode "IncludeInPublish"
- Open profile.config and add the below settings
<WelcomePageEnabled>true</WelcomePageEnabled>
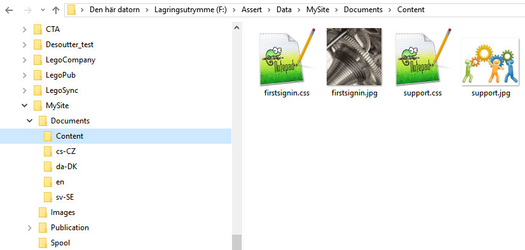
<WelcomePageDocument identity="firstsignin"/> - Create a folder "Content" under your Documents folder in the site's file area on the Manager Server and add the images and css files manually to this content folder.
Adding a legal notice
A legal notice may be placed on the welcome page and in the footer link on all other pages. The legal notice page may be made mandatory to accept prior to being allowed to enter.
- If you also wish to present a legal notice on the welcome page, add a document with the terms in the Manager. Ensure to give it an identity, e.g. "termscondition".
- Ensure to refer to the terms and conditions document from the welcome page using something like this:
<div class="welcome-enter-link">
   <a id="lnkentercatalog" href="" class="lnk-ec">Enter catalog</a>
</div>
<div class="termsconditionlink">
   <a id="lnkTC" href="#/" class="lnk-tc">AcceptTermsCondition</a>
</div> - Add these settings to profile.config.
<TermsConditionEnabled>true</TermsConditionEnabled>
<TermsConditionMandatory>true</TermsConditionMandatory>
<TermsConditionDocument identity="termscondition"/>
Sample files

See sample welcome document attached to this article.
Related articles
, multiple selections available,
Related content
Web Viewer - User Interface
Web Viewer - User Interface
Read with this
Create a support page
Create a support page
More like this
How to add messages to end users
How to add messages to end users
More like this
Create a quick start guide
Create a quick start guide
More like this
Create a popup document
Create a popup document
More like this
Technical documentation - Adding a custom footer
Technical documentation - Adding a custom footer
More like this