Using custom icons in web viewer
- Mattias Löfstrand
Analytics
Web Viewer may be configured to use custom icons in most places instead of the built in icons in the toolbar and on canvas.
Overview
Web Viewer uses a font as definitions of the icons. The characters in the font may be used to replace the existing icons.
- Make Web Viewer recognize custom icons - The font definition is placed in the site folder and referred from the css
- Use custom icons - Replacement icons are defined in profile.config
How to make the webviewer recognise customised icons
You should have the following files and folder in the folder you downloaded from Icomoon.
You will only need the font folder and the style.css document. You can delete the other folders and files.

Place the font folder and the style file in your personal folder.
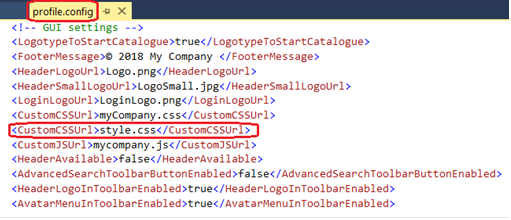
In the profile.config file (situated in the same folder), add the following line on the GUI settings part: <CustomCSSUrl>style.css</CustomCSSUrl>
At this point, you have defined the customized icons in the webviewer.
How to use my customised icons
All the icons used in the solution are FontAwesome icons, but you still can add, change icons wether they are fontAwesome or not.
first create icons section in ProfileSettings. Once this section is created you can change, add and customise existing icons.
How to change an existing icon?
<icons>
   <GlyphIcon id=”user” name=”glass” />
</icons>
This will change the icon named user by the glyphicon glass icons. There are three possibilities: you can choose GlyphIcon, FontAwesome or Icomoon icons (if you create your own icon set)
For fontawesome the process is absolutely the same for exemple:
<icons>
   <FontAwesomeIcon id=”user” name=”car” />
</icons>
But for Icomoon you have to add the name of the class you created if the name is different from icomoon for exemple, if i want to make the same exact change as previously than i have to add :
<icons>
   <IcomoonIcon id=”user” css=”myCompany-icon ” name=”myCompany-icon_001” />
</icons>
The css corresponds to the class name specified in the css file ex in yellow below, and the name attribute corresponds to the id of the icon itself ex in green bellow:

If by the same occasion you want to customize ( change the color for exemple ) of an icon you want to change, you just have to specify it in the css attribute ex:
<icons>
   <IcomoonIcon id=”user” css=”myCompany-icon  class-name ” name=”myCompany-icon_001” />
</icons>
in this exemple the icon user is remplaced by the myCompany-icon_001 icon and will have the characteristics defined in class-name css class. This works as well for FontAwesome and GlyphIcon icons.
How to add a new icon?
To add a new icon, the process is exactly the same, you just have to make sure that the name of the icon doesn't exist already, otherwise the existing icon will be changed.
How to change the color of an icon?
To change the color of an icon you just have to declare a class (or use an existing one) in your css file.
Ex:
.red {
    color:red;
}
Then you can just add this line in profile.settings:
<icons>
    <Icon id=”user” css=”red” ></Icon>
</icons>
Tips on how to create icon font
In the below document few tips on how to create a icon font are found.
Related articles