...
- Open Signifikant Manager and open your site by clicking on the carrot to the right of the "Home"-icon (
 ) in the toolbar
 - Open the Part storage by selecting "Storages | Part" from the menu or by clicking on the "Part"-icon (
 ) in the toolbar
 - Type the part number or name in the search bar on top of the storage to find out if the part already exists in the storage
- If the part does not exist yet, create it by right-clicking in the storage list and selecting "New"
A new part is added to the list but it does not contain any information yet so it looks like an empty row - Use the right pane in the Part storage window to enter the information for the created part
- Make sure the part is sellable
- Make sure that all information needed to retrieve price and availability for the part is provided
- Click on the "Save"-icon in the toolbar (
 ) to save the part to the storage
 - Open the Catalogue storage by selecting "Storages | Catalogue" from the menu or by clicking the "Catalogue"-icon (
 ) in the toolbar
 - Double click on the catalogue to which you want to add the part(s), e.g. "Accessories" or "Consumables"
If there are very many catalogues, start typing the name of the catalogue in the search bar to find it more easily - Navigate to the node in the catalogue underneath which you want to add the part, right-click on the node and select "Add part..."
- Select the part from the part storage (use the search bar to easily find it) and click on "OK"
- Select "Add to node" to insert the part underneath the selected node as a child node.
- Click on the "Save"-icon in the toolbar () to save the changes to the catalogue
- Once you have added one part underneath a node, you can use drag and drop between the part storage and the catalogue to insert more parts
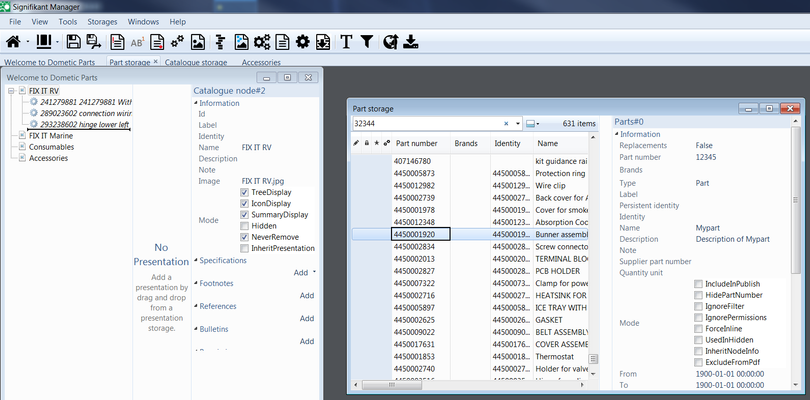
- Double click on the title of a window in Manager to undock the window.
- Arrange the catalogue window and part storage besides each other (see screen dump below)
- Drag and drop a part from the part storage to the catalogue window and drop it in place
Keep an eye on the length of the "insert line" that is shown when you hover over the catalogue window. It indicates if the part is inserted below the node or as a child of the node.
- Publish the site to your web viewer
Test the gallery shop in the web viewer
- Open your site in a web browser
- Navigate to the node that contains the Gallery Shop view
- The parts should be shown in a grid and each sellable part shall have price/availability information an "Add to order" button
The look and feel of the parts in the Gallery Shop view depends on the Presentation Settings for your site.
| Info |
|---|
Please note that you can not use the root node of a catalogue as a Gallery Shop. |
...