Parts may have images assigned to them. Each part may have zero or more images. There are a few alternative ways to assign images to parts, and the images may be displayed at the part and in the gallery.
| Info | |
|---|---|
| title | There is a difference between part and node imageNote that there is a difference between part images and node image.
But if the node has mode "InheritPresentationInfo", name, identity, description and image of the presentation will be displayed in the gallery instead. |
These options exist when assigning images to parts:
Add one image at a time by editing parts in the part storage.
Add several images at the time by importing part images in the part storage.
Assigning several images at the time to parts in the image storage.
In all the options, ensure to make part image visible in gallery if that is the intention as described below.
Adding one part image at a time
Step-by-step guide
Ensure image exist in image storage.
Open part storage and select the part.
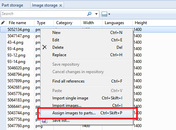
Click on "Add" in image section of the part pane as shown below and selec the image to be added to the part.
...
Importing part images
Use this method to import all images in a folder and assign all these images to parts. The matching is done between file name and part number, and each file must be named with the part number. If there are several images to a part, each part can be extended with <partno>_x to allow several images in the same part. The exact matching of file names on the images and the parts as well as allowed image types at import are defined in import.conig.
Step-by-step guide
Open part storage
In context menu select "Import part images..."
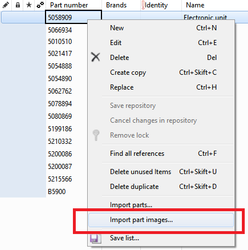
In the file select dialogue that appears, select a folder which contains the images.
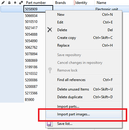
In the dialogue that appears select import options. Note that import is not enabled unless how conflicts shall be handled is selected. Se below for options.

Now all images in the folder will be imported and assigned to parts.
...
Use this method to assign images already in image storage to parts. The matching is done between file name and part number, and each file must be named with the part number. The exact matching of file names on the images and the parts is defined in import.conig.
Step-by-step guide
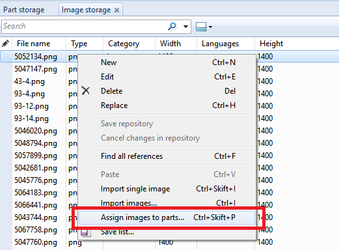
Open image storage
In context menu select "Assign images to parts..."
In the dialogue that appears select if previous images shall be removed or not.
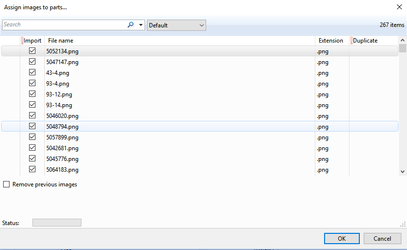
Now all images in the image storage will be traveresed and, if image file name matches part name according to import.config, assigned to parts.
...
If part images are to show in the gallery, the nodes in the gallery has to have the same part images. This can be done in the following methods:
Find the node which has a reference to the part and select image on that node.
Find the node which has a reference to the part and set mode "InheritPresentationInfo" on that node.
Use drag and drop of the part to the catalogue. In this case the node will get the "InheritPresentationInfo" set automatically.
Related articles
| Filter by label (Content by label) | ||||||||||||||
|---|---|---|---|---|---|---|---|---|---|---|---|---|---|---|
|
...
|
...
| Page Properties | ||
|---|---|---|
| ||
|